Up and running with Maven

If you've been programming for a while, you probably already know what it's like putting together large projects. There is usually a lot of pain and confusion involved in downloading libraries, frameworks and modules - We are all familiar with the saying - don't re-invent the wheel. This generally translates to use whatever library get's the job done. With Java this can be easy, you just download the *.jar[1] file and add it to your build path. This sounds simple enough, until you are at about 5 Jars or so. Then you've got to worry about different versions and method availability, etc.
This could be manageable if you are alone... But what if you are part of a team? You maybe building against v2.x of some library while Loki, up to his regular mischief may be building against v1.x out of spite or just plain ignorance. Since a lot features and methods that your project might depend on may not be available in all versions of the library, attempting to compile the project may fail in some cases or worse; the app may still compile but fail at runtime in the hands of the user. It doesn't just stop there, as the project continues to grow, even more issues will surface, with testing, deployment etc... It's just a mess.

This is where build tools like Apache Maven step in. Simply put they provide a whole bunch of goodies to make life your easier by making your project easier to manage. Maven keeps a list of dependencies that your project uses, downloads, applies them and also knows how to build your project. This way the project behaves the same way on any machine you build it on(unless you specify otherwise, but that's for a different day). Here's how to get up and running with Maven.
Do I have Java?
To find out, open up a Command Line (Windows) / Terminal (Mac / Linux) session and type in -
java -version
If you get a message similar to this
java version "1.8.0_25"
Java(TM) SE Runtime Environment (build 1.8.0_25-b17)
Java HotSpot(TM) 64-Bit Server VM (build 25.25-b02, mixed mode)
Then you are good to go. If not, you need to install the JDK.
Installing Maven
You now need to get yourself a copy of maven. While there are a few different ways to do this, I recommend going about it the easy way, using a package manager.
The easy way
A package manager is a tool that automates installing and removing software on your PC. It reduces the frustrating task of having to open the browser, find the software of interest, determine the latest version, etc... to a single instruction. Most flavors of linux generally come with a package manager built in but if you are on Windows you could use Chocolatey and If you are on a Mac, Homebrew.
-
Windows (Chocolatey) -
choco install maven -
Mac (Homebrew) -
brew install maven -
Linux (apt) -
apt-get install maven
If you did this, go ahead and skip the next section.
The not so easy way
In this part i'm going to be focussing on how to do this on windows.
Download and Extract Maven
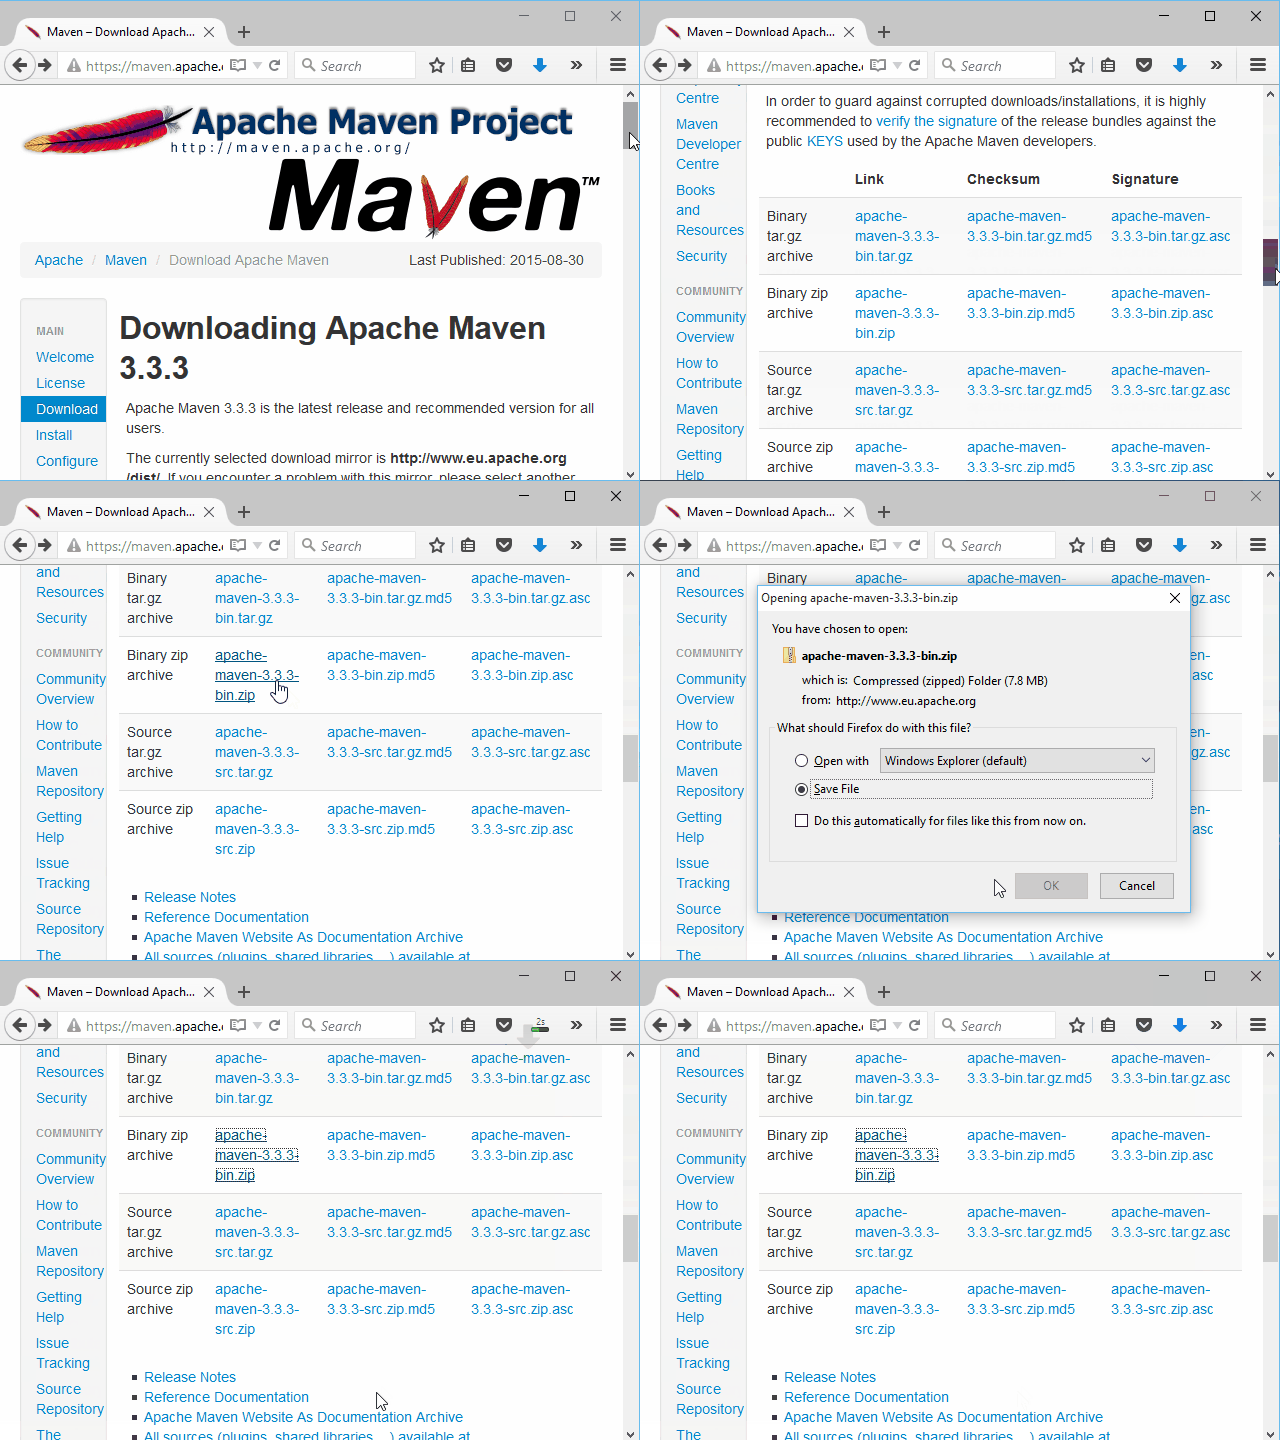
This is pretty easy, head on over to the Maven download page and download the latest Binary zip archive. At the time of writing this was apache-maven-3.3.3-bin.zip[1:1].

Unzip the file and place it in a convenient place that you don't plan on changing for a long time. I usually place it in the root of my hard drive - C:\
Add Maven to your Path
Next we need to add Maven to your system path under your environment variables. Path contains a list of commands that you can use while in a Terminal/Command line session.
To add Maven to your path,
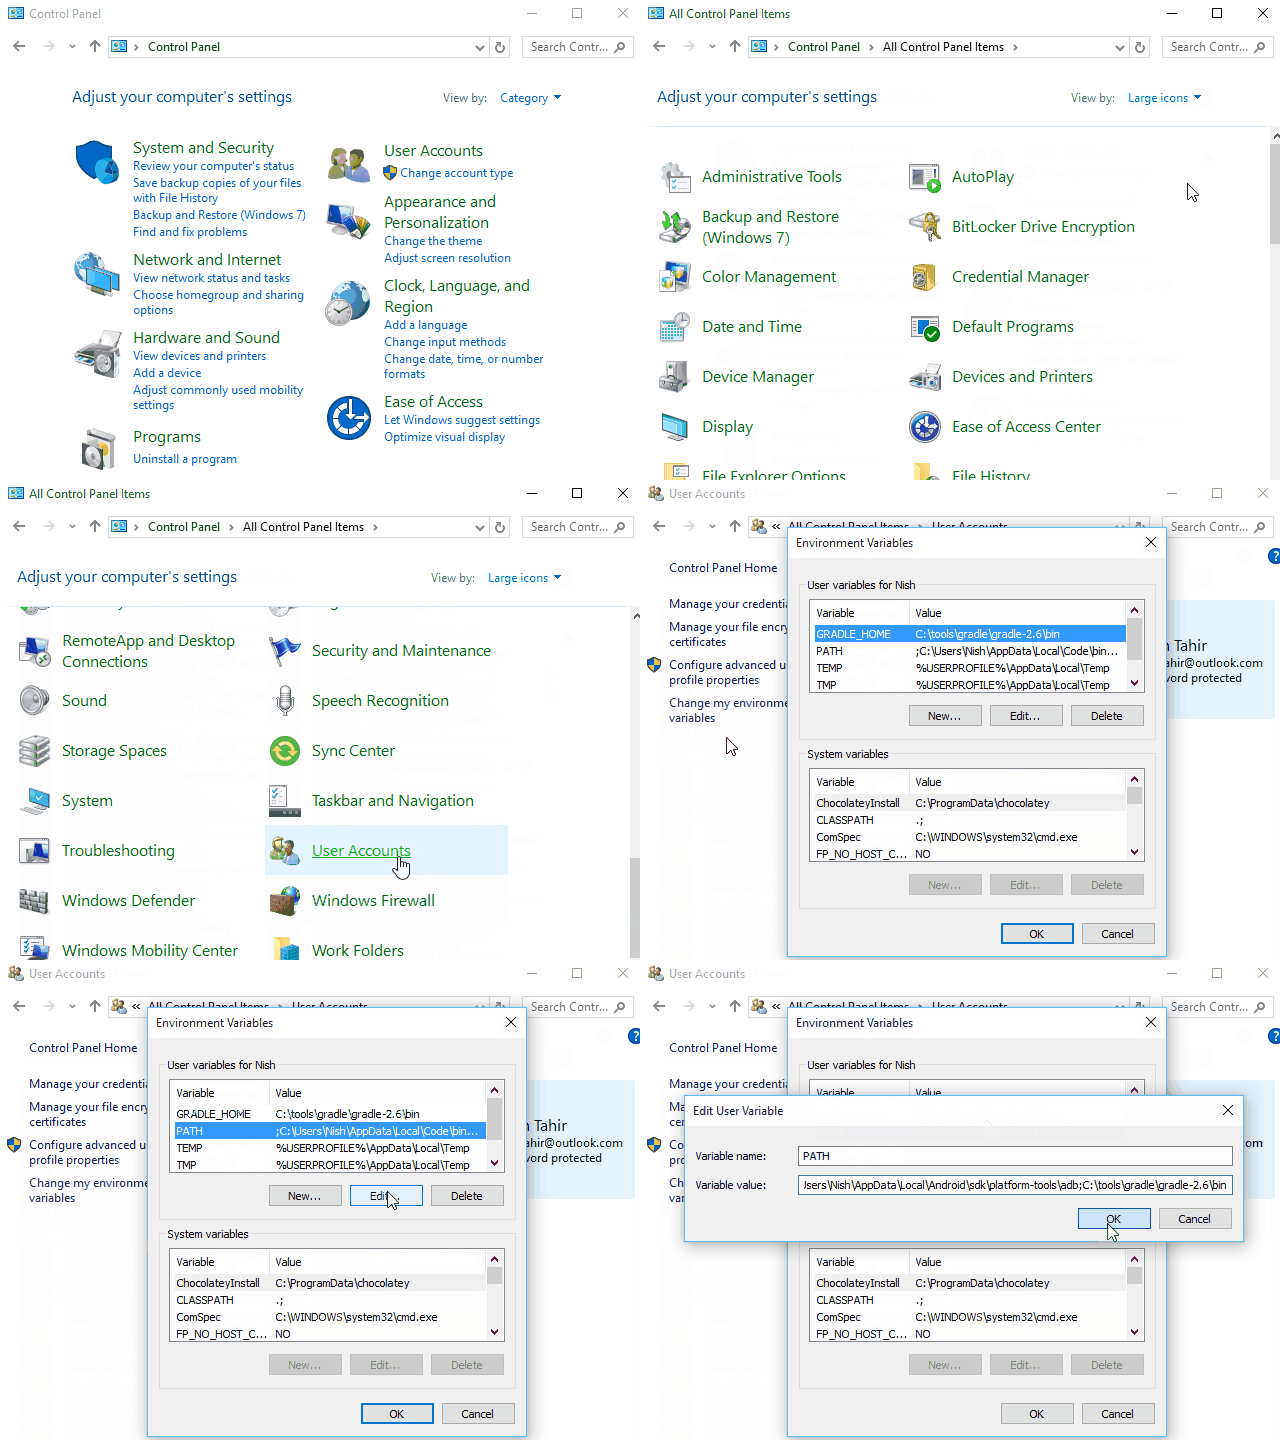
- Go to your control panel.
- Change the list from Categories to Large/Small icons.
- Scroll down the list that shows up and select User accounts.
- Click on Change my environment variables[1:2].

- Select PATH in the upper menu and select Edit. There may already be content in the Variable value line already. Scroll all the way to the end and if there is no semicolon (;) at the end, add one.
- Now add the path to the bin directory inside of the maven folder you just copied.
- Select Ok and you are done.
Check Maven is installed right
Once you are done installing Maven, we need to double check to make sure everything is working correctly. To do this, Open a Command prompt or terminal session and type in.
mvn -version
This asks maven for what version is installed. If you have a response that looks like this,
Apache Maven 3.3.3 (7994120775791599e205a5524ec3e0dfe41d4a06; 2015-04-22T14:57:37+03:00)
Maven home: C:\Users\Nish\Maven\bin\..
Java version: 1.8.0_51, vendor: Oracle Corporation
Java home: C:\Program Files\Java\jdk1.8.0_51\jre
Default locale: en_US, platform encoding: Cp1252
OS name: "windows 8.1", version: "6.3", arch: "amd64", family: "dos"
then everything is in working order. If not, something was not set up correctly and i recommend starting over.
New projects, the Maven way
We are going to have Maven generate a new project using a template. This allows Maven to manage the project and other programmers to navigate and understand the project easily.
mvn archetype:generate -DgroupId=com.mycompany.myapp -DartifactId=my-app -DarchetypeArtifactId=maven-archetype-quickstart -DinteractiveMode=false
If you are running this for the first time, Maven will go crazy and output a lot of stuff really fast. It's going onto the internet and downloading all the tools it needs to work. It caches everything in a local repository it will all be available next time you execute the command- this makes it much faster. Once you see this message,
[INFO] ------------------------------------------------------------------------
[INFO] BUILD SUCCESS
[INFO] ------------------------------------------------------------------------
[INFO] Total time: 23.574 s
[INFO] Finished at: 2015-10-04T16:43:14+03:00
[INFO] Final Memory: 13M/48M
[INFO] ------------------------------------------------------------------------
Maven has successfully generated the new project.
Looking a little closer
mvn archtype:generate basically tells maven you want to create a new project using a template.
-DgroupId=com.mycompany.myapp says that the project will be using the package com.mycompany.myapp. You can replace this with your package name[1:3].
Next we have -DartifactId=my-app. This is just the name of the application. You can also replace this with an appropriate name for your application or project.
-DarchetypeArtifactId=maven-archetype-quickstart is a little bit more tricky. This specifies an archetype which is the template that the project will be using in this case quickstart. There are a lot of archtypes out there but here are a few you should know about.
-DinteractiveMode=false tells maven that it should not ask to confirm settings that it will be using in generating the project.
Inside the standard directory layout
Successfully running the Maven command, generates a new project for you in the standard directory layout as seen below.
└── my-app           //Root of the project
    │   pom.xml      //Project Object Model - *Important*
    │
    └── src          //Source folder contains code and tests
        ├── main     //Contains only code
        │   └── java
        │       └── com     //Package starts here
        │           └── mycompany
        │               └── myapp
        │                       App.java
        │
        └── test     //Contains only tests
            └── java
                └── com
                    └── mycompany
                        └── myapp
                                AppTest.java
The Project Object Model or pom.xml contains an XML[1:4] representation of your project. It contains everything from the name and package name of the project, to what dependencies (or libraries) are used and how the project should be packaged into a *.jar for distribution.
mvncommands aimed at a project can only be executed in a directory containing apom.xml.
Opening the pom.xml inside your favorite text editor (some systems default to web browsers to open XML files, just... no), you'll see something that looks much like this -
<project xmlns="http://maven.apache.org/POM/4.0.0"
  xmlns:xsi="http://www.w3.org/2001/XMLSchema-instance"
  xsi:schemaLocation="http://maven.apache.org/POM/4.0.0
  http://maven.apache.org/maven-v4_0_0.xsd">
  <modelVersion>4.0.0</modelVersion>

  <!-- Information about your application -->
  <groupId>com.mycompany.myapp</groupId>
  <artifactId>my-app</artifactId>
  <packaging>jar</packaging>
  <version>1.0-SNAPSHOT</version>
  <name>my-app</name>
  <url>http://maven.apache.org</url>

  <!-- List of dependencies to be added to the project -->
  <dependencies>

    <!-- A dependency -->
    <dependency>
      <groupId>junit</groupId>
      <artifactId>junit</artifactId>
      <version>3.8.1</version>
      <scope>test</scope>
    </dependency>

    <!-- You can add more dependencies -->
    <!-- by adding them in here -->

  </dependencies>
</project>
Phrases you need to know
Interacting with your project is done in the command line or terminal using maven commands or phrases. There are a lot of them available and depending on what plugins you may have installed, their scope and effects may change. However, here are some of the most commonly used phrases that you need to know -
mvn dependency:copy-dependencies - Download dependencies listed in pom.xml and add them to your project.
mvn compile - Compiles your project. It does not run the tests
mvn test - Executes your test code using your test framework. It does not compile your source.
mvn package - Tests, compiles and bundles your app into the format specified in the <packaging> tag in your pom.xml. The default types that can be specified are pom, jar, maven-plugin, ejb, war, ear, rar and par.
mvn install - Package and copy the result into the local repository for use with other projects as a dependency.
mvn package -Dmaven.test.skip=true - package but skip all tests (Please avoid doing this). The -Dmaven.test.skip=true switch can also be used with install.
mvn clean - clean the results of previous builds. You may want to use this when you are experiencing problems that seem to come out of no where. Some say these are caused by the impossible man compiling Java source.
Got something to add? Join the conversation on reddit!